Guitar Anatomy: Part by Part Quick Guide
Yup, it’s true—the full rundown of guitar parts, all in one place! No more endless internet searches to piece together info about every component. Sure, this post is a bit lengthy, but it’s not too long to cover the essentials. Here, you’ll learn the basics of each part and how they shape your guitar’s unique sound. Ready? Let’s dive in!
Find your part
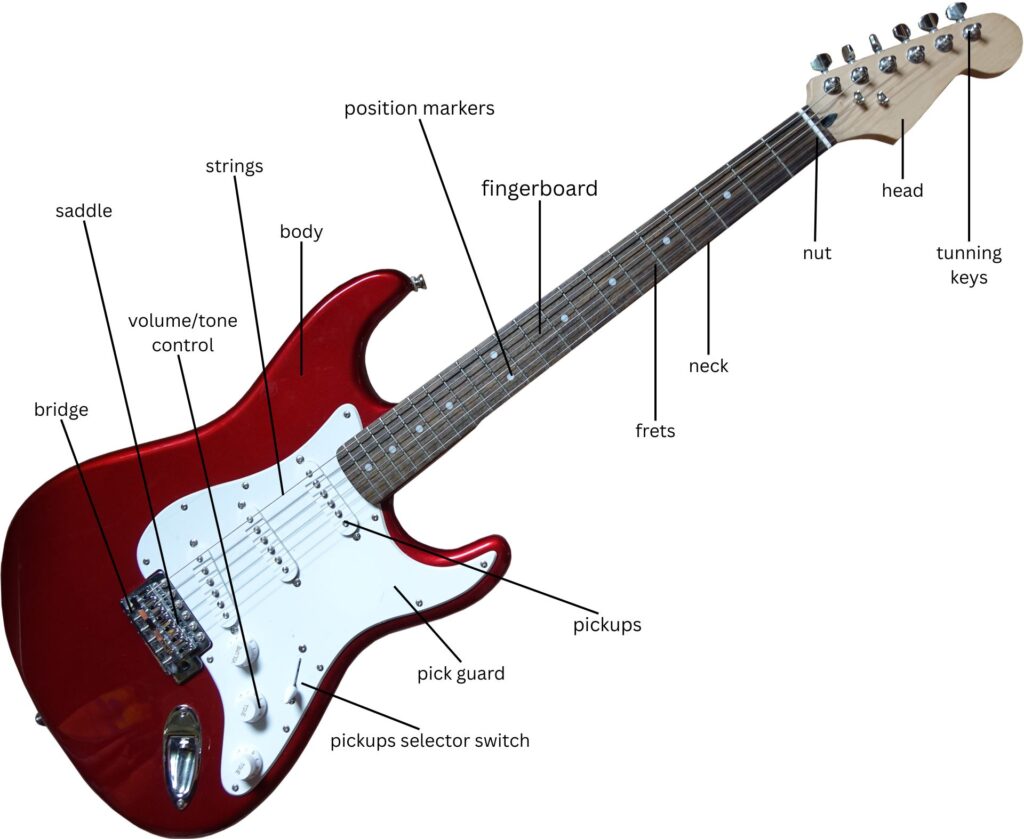
Headstock
The headstock is pretty much the same deal across a bunch of stringed instruments in the lute family. Its main job? Holding the tuning pegs and other bits that let you tighten or loosen the strings up at the top of the guitar. The headstock can either be carved as one piece with the neck or made separately and then glued or joined to it with some fancy woodworking.
Different guitar makers craft their headstocks in unique ways, each with its own vibe. But at the end of the day, they all boil down to two basic styles: angled relative to the neck or straight in line with it. Which one’s better? Eh, that’s more about personal feel and what you’re used to. My two cents? Just watch out when buying a case if your guitar’s headstock is at a steep angle—fit can be tricky.
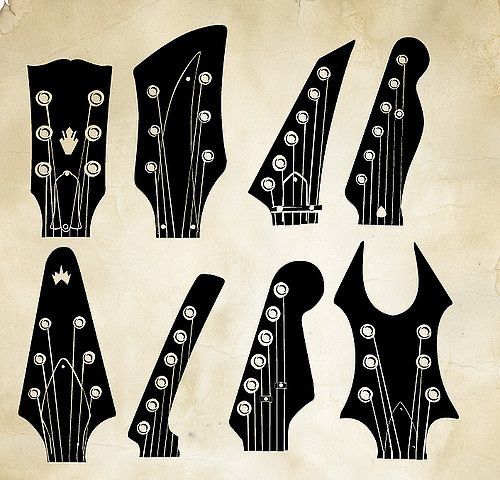
Besides its practical role, the headstock also gets to show off a bit. You can often spot a brand just by the shape of its headstock—pretty iconic stuff! One thing to keep an eye on, though, is if the headstock’s angle is too sharp or if the tuning pegs are spread too far apart, especially in a 3+3 setup (three pegs on each side). That kind of layout can pull the G and D strings too far apart, which might mess with your tuning stability.
Tuning Pegs
Oh, tuning pegs… those little miracles. The one part of our beloved guitar that lets us tighten or loosen the strings to get that perfect sound. Well, on most guitars, anyway. So, what’s inside these magical little machines? Each tuning peg is basically a small post with a hole on one end where you thread the string, and a tiny gear on the other. That gear connects to a screw mechanism that’s got a knob or button we twist to turn the post. That’s the gist of it!
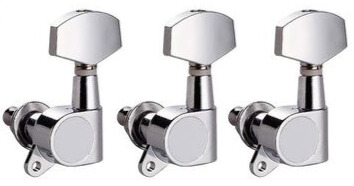
Now, there are all sorts of tuning peg makers out there, and big guitar brands often have their own fancy tuning systems, but at their core, they all work on the same basic principle. That said, there are differences. For example, the number of turns you need to fully wind a string can vary, and that affects both how you tune and how well the guitar holds that tuning.
On the looks side, it’s the little details that set them apart—like whether you’ve got three pegs in a row, old-school vintage style, or if they’re individually spaced with different shapes and screw slots. Bottom line? The more torque you need to turn those pegs, the better the control you’ve got.
The Guitar Nut
If you ever thought that little piece on your guitar isn’t a big deal, man, you’re way off! Without the nut, your guitar wouldn’t even be a guitar—it’d be unplayable, and you probably still don’t realize how crucial this tiny part is.
Seriously, it’s gotta be crafted just right so the strings don’t slip out of their slots, buzz against the frets, or make your playing feel like a chore. This thing is so important it basically has to be perfect.

So, what’s the nut doing for your axe? It’s that transition point between the neck and the headstock, where all the strings pass through on their way to the tuning pegs. No nut, no proper playing. And if you tried playing without one, your ears—and everyone else’s—would probably hate you for the awful sound.
The slots in the nut need to be cut just right: deep enough so the strings sit above the frets, but not too deep or you’ll get that annoying buzz, and not too shallow or your fingers will be crying after one song.
Even though it’s a small part, replacing a nut is a job best left to the pros. The width of the nut also sets the spacing between the strings—too tight, and it’s a pain to play; too wide, and it feels off. Then there’s the way those slots are carved. The strings need to slide over the nut at just the right angle to reach the tuning pegs.
Too sharp an angle, and your strings might snap from all the vibration. Too shallow, and they won’t sit properly, messing up the tension. Ideally, each slot should be slightly rounded so the string’s surface sits evenly, making it more stable and giving you a cleaner sound.
Oh, and the material of the nut? That matters too. It can totally shape your tone. Common materials include different types of wood, plastic, metal, ivory, or bone—each brings its own flavor to the sound.
Guitar Neck
The neck is that part of the guitar that extends from the body and holds the headstock with all those tuning pegs. Believe it or not, the neck plays a huge role in the tone coming out of your axe (acoustic axe). How so, you ask? Well, it depends on the wood used for the neck, its thickness, and how it’s connected to the body—if it’s connected at all.
The woods you’ll often see are stuff like ebony, walnut, mahogany, maple, rosewood, and a few others. The type of wood used for both the neck and body shapes the guitar’s sound, but we’ll dive deeper into that in another post.

The way the neck is attached to the body also affects the tone. The most common method is bolting it on with screws or pins—super popular because it’s easy to fix and won’t break the bank if something goes wrong. Another way is gluing the neck to the body with some clever woodworking joints. This method might be trickier to repair, but it gives you a warmer, longer-lasting tone because of how tightly the neck and body vibe together.
Then there’s the one-piece deal, where the neck and body are carved from a single chunk of wood—no glue, no screws, just one solid piece. These guitars make it easier to reach the higher frets, but they can lose a bit of vibration since there’s no separate body to resonate, which can affect how long the notes ring out.
The shape of the neck is a big deal too. It impacts how easy it is to play and move around the fretboard. It’s not just about thin or thick necks—there are basic shapes like C, D, U, and V, each with their own variations. Lately, asymmetrical neck shapes have been popping up, giving players even more options to find what feels right.
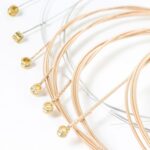
Guitar Strings: An Essential Part of the Guitar
Let’s be real—strings are what make a stringed instrument, well, stringed. Joking aside, they’re arguably the most crucial part of a guitar. Without them, a guitar just wouldn’t exist. But what exactly do strings do? They carry the vibrations created when you pluck or strum, transferring them to the pickups or the soundboard, which then turn those vibrations into sound. Strings affect not only how easy or hard it is to play but also the brightness and depth of the tone. So, what makes all these strings different?
First off, we can categorize them by material. There are nylon strings, nickel-plated, steel, bronze… those are the main ones, though there are some variations. If you’re playing an electric guitar, you don’t want nylon strings—they’re designed for classical or flamenco guitars. Bronze strings? Those are for acoustics.
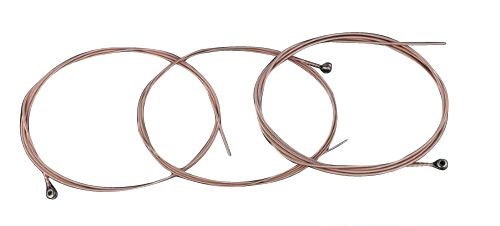
Strings also differ based on the shape of their core. There are round-core and hexagonal-core strings. Round-core strings feel smoother on your fingers and are gentler on the frets. Hexagonal-core strings, on the other hand, last longer because their shape doesn’t trap oils and sweat from your hands as much.
Then there’s the winding style. Most strings have a roundwound design (the go-to for many players), but there are also flatwound strings. What’s the difference? Roundwound strings give you a brighter, clearer tone, but they tend to lose their freshness faster. Flatwound strings deliver a deeper, more layered tone and hold their tonal clarity longer, making them more durable. You’ll often hear that flatwounds are for jazz, but don’t let that limit you—they work great in any genre.
Oh, and you’ve probably noticed strings come in different gauges (thicknesses). String gauge is measured in thousandths of an inch, and we always refer to the thinnest string in a set. For example, a “10” set means the thinnest string is 0.010 inches, with the others being thicker. You might think the genre you play dictates your string gauge, but that’s not entirely true.
Sure, heavier music might lean toward thicker strings, but there are plenty of blues players rocking 12s and metalheads shredding on 9s or 10s. It’s all about the tension and what feels right for you. For instance, playing 12s in standard E tuning requires some serious finger strength, but drop that to a C tuning, and it’s a lot easier to handle. I could go on about strings forever, but let’s leave it here for now—this topic deserves its own deep dive later.
The Fingerboard
Alright, just like every part of your guitar shapes its tone in some way, the fingerboard (or fretboard, if you wanna sound fancy) does its part too. It might not be as in-your-face as other components, but trust me, it makes a difference. Sure, picking the wood for the fingerboard is mostly about looks, but it also tweaks the tone a bit.
The big three woods you’ll see are ebony, rosewood, and maple. At first glance, they differ in color and vibe, but it’s also about how hard the wood is. Ebony’s been used in stringed instruments for like 500 years, rocking that dark brown, almost black look. Rosewood got its big break thanks to Antonio de Torres back in the mid-19th century, while maple became a staple with Fender’s rise in the music world.
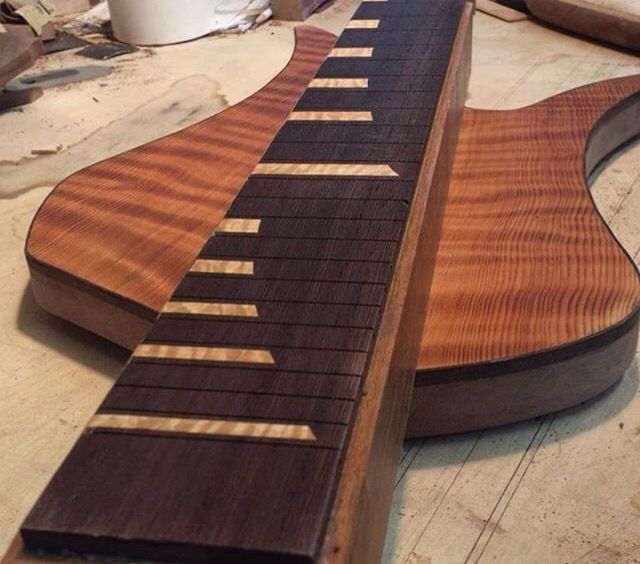
If you’re into that high-contrast style and have a black guitar, you might go for a maple fingerboard for its bright, creamy-white look. But if you’re after harder wood, rosewood or ebony are your go-to. Truth is, you might not even notice how the material feels under your fingers since you’re mostly touching the strings, not the board itself.
What’s probably more important is the fingerboard’s radius and shape. For example, if you’re used to an electric guitar with a slightly curved fingerboard, switching to a classical guitar with a totally flat one might feel weird and awkward at first. It’s all about practice and getting used to it, though—seasoned players who’ve jammed on all sorts of guitars won’t sweat switching between them.
If you can, always try a guitar before buying it. Different woods also react differently to temperature changes, shrinking or expanding, which can throw your strings out of tune. Lately, synthetic materials like carbon fiber are popping up more often since they’re tougher against those temperature swings.
Frets
You might wonder why guitars have frets when other stringed instruments, like violins, sound amazing without them. I had the same question, so I did some digging. Why do guitars have frets while violins don’t? What’s their purpose? Turns out, there are a few logical and practical reasons.
First, frets make it way easier to learn and master notes and scales. Without them, navigating the fretboard would be a nightmare, requiring way more practice to nail down your positioning. Second, frets give notes better sustain. On a fretted guitar, the tone doesn’t just depend on your pluck, finger, and the neck—it’s the frets that help the note ring out longer.
That’s why string players use bows; without them, notes (like in pizzicato violin playing) are super short. Third, frets help maintain tuning and intonation. Without them, you’d need unbelievable precision to hit the exact note you want. And finally, playing chords or multiple notes at once would be nearly impossible without frets—good luck pulling off complex chords without them!
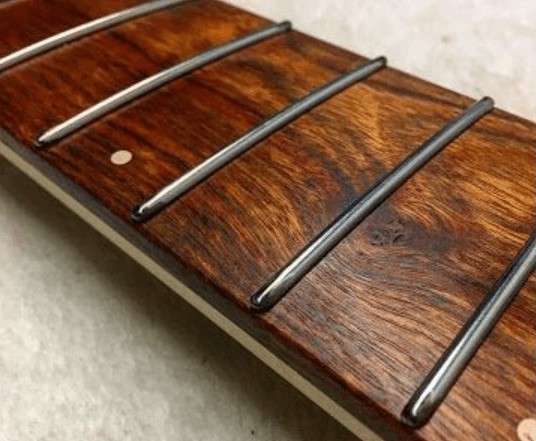
Does fret size matter? You bet it does. Larger jumbo frets make fast playing and soloing easier since you don’t need to press down as hard. But for beginners, jumbo frets might not be ideal until you develop a solid grip. New players tend to press too hard, which can make the guitar sound out of tune with bigger frets.
What about fret material? Just like with other guitar parts, there are options, but it mostly boils down to two: nickel-silver and stainless steel. There are variations, but these are the main players. The difference? It’s subtle, mostly in tone and feel. Some say stainless steel frets make bending strings easier, while others claim they can cause a slight buzz with certain notes. Honestly, it’s pretty subjective.
What’s clear is that nickel-silver frets wear out faster and are more prone to wear, but they’re easier for luthiers to work with because the material is softer. Stainless steel frets, meanwhile, are tougher and last longer. The key takeaway? Frets are there to keep your intonation on point and make navigating the fretboard easier. You’ll get used to their size and material over time.
Position Markers
Alright, position markers are one of those guitar parts that don’t mess with the sound quality—good or bad. Their main job? Helping you navigate the neck of your axe quickly and easily. Oh, and they look pretty cool too, but we’ll get to that. If you’ve been playing for a while, you already know this, and if you’re just starting out, you’ve probably noticed: these markers sit on specific frets—3rd, 5th, 7th, 9th, and 12th (which is also the octave). Then the pattern repeats on the 15th, 17th, 19th, 21st, and—if your guitar has enough frets—the 24th, where you hit another octave. These little guys help you find the note you’re after without fumbling around.
Say you’re trying to find an F note on the B string. You know the 5th fret (with a marker) is an E, so the F is right next door. Easy, right? You can apply that logic to tons of notes, scales, and chords. Practicing to quickly spot these notes and their matching harmonies is always a good move, and markers make it way easier, especially for beginners who are still getting the hang of things.
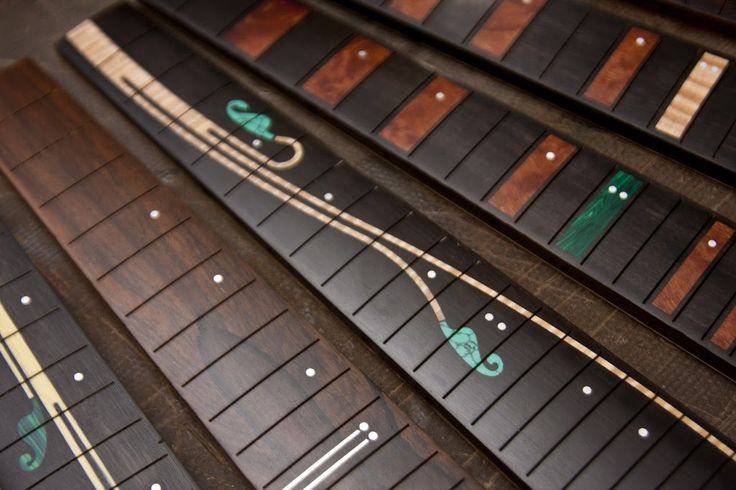
Now, on top of being practical, markers are also there to add some style to your fretboard. Most often, they’re simple dots—one dot on the marked frets, except for the 12th and 24th, where you usually get two dots to highlight those octaves. But makers get creative with shapes like arrows, shark teeth, squares, diamonds, trapezoids—you name it. Circles are the classic go-to, though.
Classical guitars? They usually skip markers altogether. On the flip side, take something like a custom Steve Vai Ibanez, where you’ve got this gorgeous pattern sprawling across the fretboard with little leaves popping out at key spots. At the end of the day, the style of markers is all about personal taste, but there’s no denying they make playing a whole lot smoother.
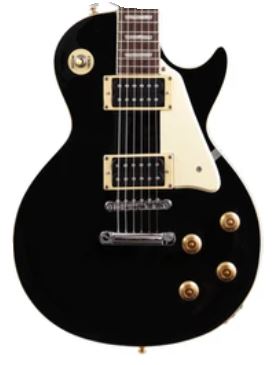
The Guitar Body
Here we are, finally at the most iconic part of the guitar—the body. This is the part that screams “guitar” the loudest. If it’s an electric, you’ve got pickups, knobs, switches, a jack for the cable, and all sorts of cool aesthetic touches. If it’s an acoustic, the body’s the biggest piece, doubling as the soundbox with that classic hole in the middle.
The body is what makes a guitar instantly recognizable. Anyone can spot the difference between a Fender, Gibson, or Ibanez, and even between their different designs. Think Telecaster vs. Stratocaster, or Les Paul vs. SG—night and day, right? The body gives your axe its vibe and personality. Want to play like your guitar hero? You’ll probably grab a guitar just like theirs, or at least close enough.
The body’s also the heaviest part, so it plays a big role in how the guitar feels weight-wise. Its shape and where your right hand rests can make a difference in how comfy it is to play. For electric guitars, the body itself doesn’t impact the sound as much as other factors do.
But for acoustic and classical guitars? Oh, the body is everything when it comes to tone. Size, shape, and the wood it’s made from are huge. For example, maple gives you a brighter, more open sound, while mahogany leans darker and warmer. It’s a big topic, so we’ll dig into it more in a separate post. Point is, you might not always know the brand of an acoustic just by looking at its body, but you’ll definitely hear the difference based on its shape and materials.
Pickguard
Like every part of a guitar, the pickguard has its job—both practical and aesthetic. Its name pretty much gives it away: it protects the guitar’s finish from getting scratched up by your pick or nails. You might think, “Nah, I don’t scratch my guitar!” But take that pickguard off, play for a year or two, and then tell me you’re not leaving marks. It’s especially a lifesaver for beginners who are still figuring out their strumming.
The most iconic guitar with a pickguard? Gotta be the Fender Stratocaster. That thing covers half the body, shields the finish, and hides the electronics tucked inside. So, if you need to mess with the wiring, you’re popping off the whole pickguard. Another example is the Gibson Les Paul’s floating pickguard—it’s literally there just to protect the paint job, and that’s it.
Soundhole
You can’t picture an acoustic guitar without a soundhole—it’s that essential. If I asked you to draw a guitar, I’d bet my axe you’d include one. But what’s its deal? You might think the soundhole makes the sound. Nope, not quite. It’s more like a doorway that lets the sound out. The vibrations bouncing off the guitar’s soundboard get released into the air through the soundhole, which itself vibrates a bit under the pressure. That’s why it’s reinforced on the inside.
The loudness of your sound depends on stuff like the size of the guitar’s body and the diameter of the soundhole. And they don’t always have to be round—some guitars rock f-holes (common on semi-hollow or hollow-body electrics) or rosettes, which you’ll usually spot on lutes.
Pickups: Guitar Parts That Shape the Sound
Alright, we’ve reached the heart and soul of the electric guitar—the pickups. These little wonders are what turn your string vibrations into an electric signal. Pure magic, right? So, what’s a pickup made of? It’s basically a magnet, a copper coil, and some tiny wires that carry the energy along. There are tons of pickup brands out there, each with its signature sound, but at the core, you’ve got two main types: single-coil and humbucker. Seasoned players know the deal, but if you’re new to this awesome world of music, here’s the lowdown.
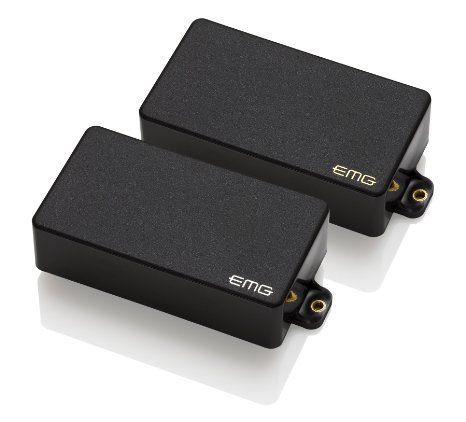
Single-coils have one coil, while humbuckers have two. How does it all work? Picture this: a single-coil usually has six magnetic poles wrapped in a copper coil. When you strum or pick, the strings vibrate, the magnet picks up those vibes, and the coil sends an electric signal to your amp, which turns it into sound. Pretty straightforward, huh?
Now, you’re probably wondering, “What’s the deal with humbuckers?” Think of them as two single-coils joined together, wrapped in a double coil. What’s the benefit? They cancel out the hum and noise that single-coils can pick up. The magnets in a humbucker work together to quiet things down, giving you a richer, fuller sound that can get seriously loud.
Now that we’ve got the types down, let’s talk about how they’re powered. Don’t worry, it’s not complicated. Pickups are either active or passive. They look the same from the outside, but active pickups need an extra power source (like a 9V battery), while passive ones run straight off your guitar cable.
Active pickups give you a more layered sound with a wider range of tones, but they’re quieter. Passive ones? They’ve got that classic, vintage vibe and pack a louder punch. We’ll dive deeper into the sounds and possibilities of different pickups in another post.
Pickup Switch
In the last section, I gave you the rundown on the types of pickups. Now, let’s talk about where they’re placed on the guitar and how you can switch between them—or even combine a couple—to get the tone you’re after. Like we said, you’ve got single-coil and humbucker pickups as the main players.
Depending on the guitar maker, you might get one type, the other, or a mix of both. For example, a Fender Stratocaster rocks three single-coils (S-S-S), a Telecaster has two (S-S), a Gibson Les Paul comes with two humbuckers (H-H), and some Ibanez models mix it up with setups like H-S-H or H-S-S.
Now, as most of you probably know, you can control which pickup—or pair of pickups—is active to dial in your sound. That’s where the pickup switch comes in. This little guy is usually found on the guitar’s body, right under the strings, close to the knobs—not too far from your picking hand, but not in the way either. On some guitars, you’ll see the switch sitting above the strings. So, how does it work? Let’s take a Strat with its three single-coils as an example:
• Position 1: (switch all the way down): Only the bridge pickup is on, giving you that sharp, twangy tone.
• Position 2: The bridge and middle pickups team up for a blended sound.
• Position 3: Just the middle pickup, nice and balanced.
• Position 4: The middle and neck pickups work together for a smoother vibe.
• Position 5: Only the neck pickup, perfect for those warm, mellow tones.
That’s the gist of it! The same logic applies to pretty much any guitar. The first position fires up the pickup closest to the bridge, the last one hits the neck pickup, and everything in between is a combo. With time, flipping that switch will become second nature, and you’ll be jumping between positions like a pro in no time.
Potentiometers
Alright, here’s another part of your guitar that, alongside the pickup switch, can seriously shape your tone and volume. These are the knobs, sitting right under the strings, close enough for your hand to tweak on the fly. You turn them clockwise or counterclockwise to dial in exactly what you want. It depends on the guitar maker, but usually, you’ve got one knob for tone—controlling those bright, high frequencies—and another for volume, cranking up or dialing down the output.
Some guitars, like a Gibson, might have four: two for tone and two for volume, one pair for each humbucker. That setup lets you fine-tune the sound’s character like a pro. My advice? Play around with these bad boys as much as you can—you never know what kind of cool tones you’ll stumble across.
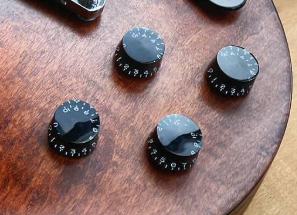
On top of that, some guitars have a potentiometer that pulls out or pushes in to act as a switch for specific pickups. What’s that about? Well, this brings us to a lesser-known but super cool feature: coil split and coil tap.
Wondering what those are? Let’s break it down. Coil split is something you’ll only find on humbuckers. By pulling or pushing the knob, you can turn off one of the humbucker’s coils, making it sound more like a single-coil for that brighter, snappier tone.
Coil tap, on the other hand, is for single-coil pickups. Here’s the deal: some single-coils are wound with, say, 4,000 wraps of copper wire, then a switch is added, and they’re wound another 1,000 times. When you engage the coil tap, you’re using all 5,000 wraps for a louder, fuller sound. Turn it off, and you’re back to the 4,000-wrap vibe. See? These little knobs are hiding a ton of possibilities. Just keep tweaking and experimenting to find the sound that’s you.
Saddle
Here’s another one of those small, almost sneaky parts of the guitar that’s way more important than it looks—the saddle, or bridge. It’s a different beast on acoustic versus electric guitars. On classical and acoustic guitars, the saddle is glued or joined to the bridge and transfers the string vibrations through the bridge to the soundbox. In most cases, all six strings rest on a single saddle piece, usually made of bone or plastic.
On electric guitars, though, the saddle’s a bit different. It’s typically metal, held in place with screws or Allen keys, and each string often gets its own individual saddle, depending on the guitar’s design.
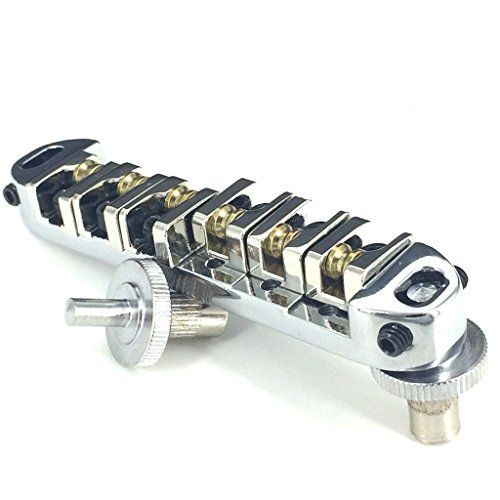
But whether it’s acoustic or electric, the saddle’s job is the same: it anchors the strings and sets the distance between them and the frets. How you adjust it depends on the type of guitar. Want to lower the strings on your acoustic? You’ll need to carefully file down the saddle bit by bit with a fine file.
The catch? If you go too far, you’ve got a problem, and you’ll likely need a new saddle to start over. So, unless you’re super confident, it’s best to leave this to the pros. On electric guitars, it’s a bit easier. You can tweak the string height with an Allen key, and it’s no big deal to reset things if you don’t like the result. Still, if you’re not sure about doing it yourself, hand it over to someone who knows their stuff.
Bridge
The guitar bridge is the part that anchors your strings and passes their vibrations to the guitar’s body (or soundbox, if we’re talking acoustics). This is a super important piece of your axe—it plays a big role in both intonation and tone. On acoustic guitars, the bridge is usually made of wood and works with the saddle to send those string vibrations into the soundbox. For electric guitars, it does the same job, but you’ve got two main types: fixed bridges and tremolo bridges.
Fixed bridges are what you’ll see on guitars like the Telecaster or Les Paul. They’re rock-solid for keeping your tuning stable and help sustain those long, ringing notes. Changing strings on these is a breeze, and they’re great for tweaking scale length and intonation.
Then you’ve got tremolo bridges, which come in a few flavors. First up is the floating tremolo, like the one on a Stratocaster. It’s attached to the body on one end but free on the other, with springs hooking the bottom part to the guitar. You use a whammy bar to control vibrato, and those springs snap the bridge back to its original position.
Next, there’s the locking tremolo—think Floyd Rose. This bad boy comes with a locking nut that keeps your tuning on lock, no matter how much you dive-bomb or pull up on the whammy bar. Sounds perfect, right? Well, there’s a catch. Changing strings or tuning with a locking tremolo can be a total nightmare. If a string breaks mid-gig, the whole system goes out of whack since it’s designed to work as one unit. You’d have to retune everything from scratch—not fun in the middle of a show.
Finally, there’s the roller tremolo. With this one, the strings wrap over and under the tremolo arm, then pass over the bridge. Its design makes it a good fit for hollow or semi-hollow guitars, giving off a cool vintage vibe. The downside? It’s not the most reliable for staying in tune. That’s the rundown for now, but we’ll dive deeper into bridges in a future post. After all, this is just the basics of guitar anatomy.
Additional Guitar Parts
Of course, there are a few more guitar parts I haven’t touched on yet. For acoustic guitars, you’ve got bridge pins, those little guys that keep the strings locked in place so they don’t go flying everywhere. On electric guitars and some amplified acoustics, there’s the output jack for plugging in your cable. Both types of guitars also have strap buttons for attaching a strap.
But there’s one sneaky, super important part hiding inside: the truss rod. This is a metal rod running the length of the guitar’s neck. Why’s it there? It keeps the neck from warping or bending under the tension of the strings. Trust me, this hidden hero is a big deal. You can adjust it through an access point at the headstock or where the neck meets the body. But, like with some other tweaks, I’d recommend leaving truss rod adjustments to the pros.
Conclusion
All these parts I’ve thrown out there and described are very important. They are the guitar—every single one is a key piece of the puzzle. You just can’t picture this instrument without them. I’ll dive deeper into each part in future posts, with more details, examples, and a bit of history to show their role. For now, that’s the rundown!