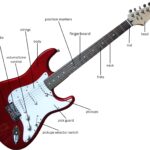
Setting Up Your Guitar at Home
You’ve probably just changed your guitar strings, maybe switched to a heavier or lighter gauge, and now something feels off. Your guitar doesn’t sound the way you’re used to, and it’s definitely not how you wanted it to sound. What’s going on? You can’t quite figure it out, and there’s no repair tech nearby. The local music stores don’t have a luthier on hand either. This wasn’t how you pictured a simple string change. You might be wondering, “If I switch back to the old gauge, will everything be fine again?” You’re starting to sweat and feel helpless. Well, that’s where this guide comes in. You’re here for a reason. Every decision you’ve made in life has led you to this article.
I’m going to walk you through the easiest way to set up your beloved instrument after a string change or when something just doesn’t feel right. Maybe the intonation is off, certain notes aren’t ringing out clearly, or your strings are buzzing on specific frets. Take it easy—you’re not the first person to deal with this, and you won’t be the last. There’s a solution for everything.
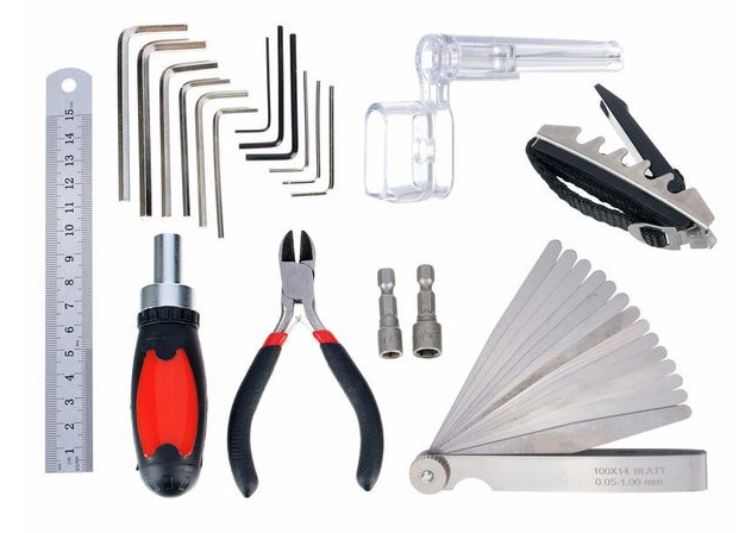
You can do plenty at home to make your electric guitar sound as good as it used to—or even better. You don’t need much: just a few screwdrivers in different sizes, a set of Allen keys, a string action gauge, a feeler gauge, a tuner and a capo. Of course, you’ll also need a cloth and some cleaning products, but you probably already have those. Let’s get started from the very beginning.
Good Preparation Is Half the Job
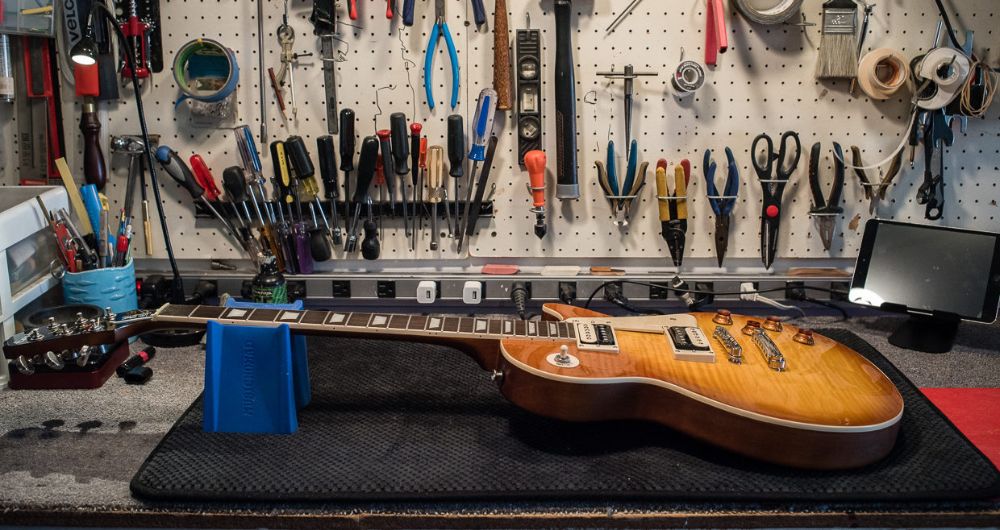
I don’t know about you, but when I cook, I prep all my ingredients, pots, and utensils before I start. The same goes for guitar maintenance. Preparation is key (at least for me). Set up a flat surface covered with a towel or soft blanket to avoid scratching your guitar or letting it slide around. Make sure you have good lighting so you can see every step clearly. Gather all your tools: a flathead screwdriver, a Phillips screwdriver, various Allen keys, a feeler gauge, a string action gauge, a capo (you’ll see why later), and a tuner—ideally a pedal tuner for a direct signal, though a reliable headstock tuner will work too. And, of course, a fresh pack of strings.
Changing String and Cleaning the Fretboard
If you’re taking the time to set up your guitar, please don’t do it with old strings. Worn-out, dead strings won’t give you the same results as fresh ones. After setting up your workspace and tools, start by removing the old strings. You can unwind them from the tuning pegs and pull them out, or loosen them slightly, cut them with wire cutters, and remove them to save time.
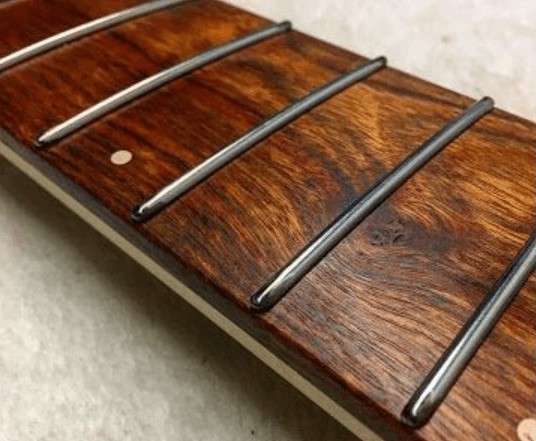
With the old strings off, you’ll probably notice how dirty your fretboard is. Not exactly pretty, right? I recommend cleaning it now, before putting on new strings, because it’s nearly impossible to do properly afterward. Use a specialized fretboard cleaner, apply a small amount, let it sit for a bit, and polish it with a cloth. Don’t overdo the cleaner—it’s a wooden surface, and too much moisture can cause slight swelling. If you want to go the extra mile (and I always do), use a sharp tool to gently scrape out dirt from around the frets. Just don’t press too hard. It takes a little longer, but it’s worth it.
Once that’s done, take a moment to smell the fretboard—it’s surprisingly satisfying! Kidding aside, it does smell nice. Now it’s time to install the new strings. Put them on, tune them up, and give them a little stretch before diving into the setup. Make sure to tune to the tuning you plan to use. Imagine setting up your guitar for one tuning and then playing in another—it wouldn’t end well. Always stretch the strings a bit before making adjustments. Think of it like warming up your muscles.
Adjusting the Truss Rod
The truss rod is a metal rod running through the neck of an electric guitar (and some acoustics) that keeps the neck stable. It’s crucial: too loose, and the neck bows inward under string tension; too tight, and it bows outward. Neither is good. A warped neck can cause string buzz, dead notes, or notes that don’t ring out clearly.
To adjust it, you’ll need an Allen key and, for precision, a feeler gauge. On most guitars, the truss rod access is at the headstock, under a small cover you’ll remove with a screwdriver. You’ll use the low E string for this adjustment.
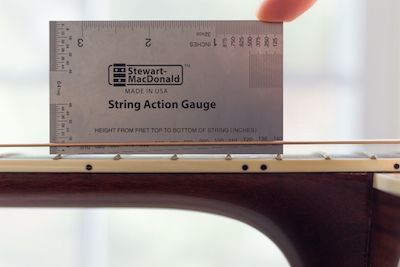
Here’s what to do: Place the guitar in your lap as if you’re playing it. Put a capo on the first fret and press down on the fret where the neck joins the body (usually around the 17th or 18th fret) on the low E string. Look at the 8th or 9th fret. There should be a very small gap between the top of the fret and the bottom of the string—ideally about 0.2–0.4 mm (or roughly 0.010 inches). Depending on your preference, you might want a slightly larger or smaller gap, but this is a solid starting point. A feeler gauge can help measure this precisely.
If the gap is too small or nonexistent, you need to loosen the truss rod. Slightly detune the strings, insert the Allen key, and turn counterclockwise—no more than a quarter turn at a time. Retune the strings and check again. Repeat until you get the desired gap.
If the gap is too large, tighten the truss rod. Detune the strings, insert the Allen key, and turn clockwise—again, no more than a quarter turn. If you’re unsure, make smaller adjustments and check repeatedly. Retune and test. A well-adjusted truss rod eliminates buzz and dead notes and sets the stage for proper string height and intonation.
Adjusting String Height (Action)
Now that your truss rod is set and the neck is straight as an arrow, it’s time to adjust the string height. Strings that are too high are harder to play, requiring more finger strength and slowing you down. Strings that are too low can buzz or produce incomplete notes. You need to find the sweet spot. On electric guitars, adjusting the action is simpler than on acoustics.
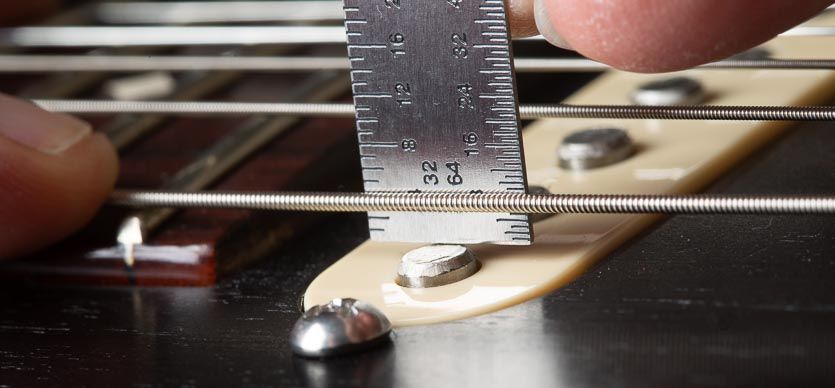
Depending on your guitar, you’ll need either a small Allen key (for individual saddles, like on a Stratocaster) or a flathead screwdriver (for bridges like on a Les Paul). Measure the string height at the 12th fret, from the top of the fret to the bottom of the string. A good starting point is about 2 mm (or 5/64 inches) for the low E string and 1.5 mm (or 4/64 inches) for the high E string. Adjust the other strings relative to these two. Always detune the strings slightly before adjusting the bridge screws, then retune afterward.
Setting Intonation
Intonation is critical if you want every note and position on the neck to be in tune while you’re shredding riffs or solos. You’ll adjust this by moving the bridge saddles closer to or farther from the bridge, depending on the situation. You’ll need a tuner for this.
Here’s the process: Tune your strings to your desired tuning. Play an open string, then press down at the 12th fret on the same string and play it again. If the intonation is correct, the notes will match perfectly. If not, here’s what to do:
• If the 12th-fret note is sharp, move the saddle closer to the bridge to lengthen the scale, bringing the note back in tune.
• If the 12th-fret note is flat, move the saddle away from the bridge to shorten the scale, correcting the note.
On most guitars, you can adjust each string’s saddle individually with a screwdriver. On some, the saddles are paired. Always detune the strings slightly before adjusting the saddle screws, then retune.
Adjusting Pickup Height
Many guitarists never adjust their pickup height, playing with the pickups as they came from the factory. But tweaking the distance between the strings and pickups can make a big difference. Closer pickups produce a louder sound as they capture more string vibration, but too close, and you’ll get noise or buzz. Too far, and the tone becomes weak.
To adjust, press a string down at the last fret and measure the distance from the bottom of the string to the top of the pickup. A good starting point is about 2 mm (5/64 inches) for the high E string and just under 2.5 mm (6/64 inches) for the low E string. Use a Phillips screwdriver to adjust the screws on either side of the pickup. The ideal distance depends on your preference, but nobody likes buzz or noise while playing.
Final Cleaning
Now that you’ve adjusted the truss rod, string height, intonation, and pickup height, it’s time to polish your beloved instrument. Sure, you could’ve cleaned it at the start, but I prefer doing it at the end—it leaves the guitar sparkling and smelling great.
You’ve probably polished your guitar before, so you know the drill: spray a little polish, wipe it down with a cloth, and you’re done. Before polishing, use a small brush (like a paintbrush) to remove dust from hard-to-reach spots, like around the pickups or knobs. Once polished, your guitar might just double as a mirror.
Conclusion
See? You can do it all yourself. Research a bit, try things out, make a mistake or two, and voilà—you’ve got it. Of course, if something’s not working out, take your guitar to a professional. Just don’t overdo it with the truss rod, string height, or pickup adjustments. Keep it simple.
I didn’t cover acoustic guitar setups here because they require more expertise and precision, and I’m not comfortable recommending specific steps without deeper guidance. Stick to these basics for your electric guitar, take your time, and it’ll sound better than when you bought it.